

How to Prep Your Home’s Heating System Before the First CT Frost

As leaves begin to change across Fairfield County, smart homeowners know that cold weather is right around the corner. Taking the time to prep heating system before frost hits is the single best way to protect your budget, safeguard your family, and guarantee uninterrupted warmth throughout the New England winter. A sudden autumnal freeze can put immense strain on a heating unit that has sat idle for months. By performing simple maintenance steps early in the fall, you ensure that your equipment turns on smoothly, runs efficiently, and keeps utility bills manageable when temperatures plummet.
This comprehensive seasonal checklist guides you through basic DIY tasks to perform before the first freeze, highlights critical safety checks, and explains when to call professional technicians at Climate Care to keep your system performing at peak capacity.
1. Clear Around Vents, Radiators, and Outdoor Units
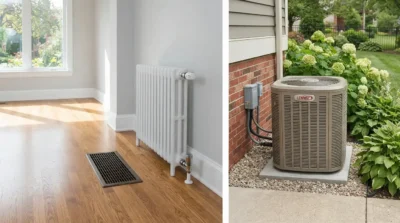 Restricted airflow is one of the leading causes of inefficient heating and accidental system shutdowns. Over the summer, furniture gets rearranged, dust accumulates, and outdoor foliage grows rapidly. Taking time to inspect and clear your heat distribution points allows warm air to circulate freely throughout your living areas.
Indoor Vents and Registers
Walk through every room in your house and inspect all supply and return vents.
-
Move Obstructions: Ensure rugs, drapes, couches, and dog beds are at least two feet away from registers.
-
Open Closed Vents: Keep supply vents open, even in unused rooms. Closing vents in modern forced-air systems disrupts static pressure, forcing your blower motor to work harder and increasing the risk of heat exchanger damage.
-
Vacuum Dust Accumulation: Dust and pet hair frequently collect on vent covers over the summer. Use a vacuum hose attachment to clean the grilles thoroughly before turning your heat on for the first time.
Radiators and Baseboard Heaters
If your home relies on hot water or steam heating, baseboard units and classic iron radiators need adequate room to radiate warmth.
-
Clear away dust bunnies and pet fur underneath baseboard heaters using a thin brush or vacuum crevice tool.
-
Avoid placing flammable materials or heavy furniture directly against radiators.
-
Check radiator valves for rust or moisture buildup that might indicate a leak.
Outdoor Heat Pump and Condenser Clearance
For homeowners utilizing heat pumps, outdoor units require special attention before frost arrives.
-
Clear fallen leaves, twigs, and overgrown garden foliage within a three-foot radius of the cabinet.
-
Ensure gutters directly above the heat pump are clean so water does not drip onto the unit and freeze into a solid block of ice during late-autumn cold snaps.
2. Inspect and Replace Your Furnace Air Filters
Checking and replacing air filters is one of the simplest, most impactful tasks you can perform when you prep heating system before frost. A clogged, dirty filter restricts airflow, forcing your blower motor to run longer and draw significantly more energy. In severe cases, restricted airflow causes heat to build up inside the furnace, triggering safety switches that shut the system down completely.
Steps for Replacing Your Filter
-
Turn off Power: Switch off your heating unit at the main power switch or breaker panel before opening the blower compartment.
-
Remove the Old Filter: Note the direction of the airflow arrows printed on the frame.
-
Inspect the Filter: Hold the filter up to a light source. If light cannot pass through easily, it is time for a fresh replacement.
-
Insert the New Filter: Ensure the airflow arrows point toward the blower motor and away from the return air ductwork.
-
Record the Date: Write the date of installation on the edge of the filter frame to track your maintenance schedule throughout the winter.
If you notice excessive dust accumulation returning rapidly after a filter swap, or if family members suffer from unexplained autumn allergies, it may point to deeper issues within your home’s ductwork. Reviewing dedicated indoor air quality solutions or professional duct cleaning services helps remove years of trapped debris, dander, and mold spores before you seal your house up for the winter.
3. Test and Calibrate Your Thermostat
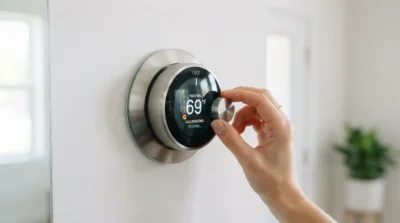 Your thermostat serves as the brain of your entire heating network. If it is inaccurate, uncalibrated, or running on dying batteries, your heating system cannot operate efficiently.
Battery Replacement and Basic Upkeep
Start your autumnal prep by opening your thermostat casing and replacing the batteries with fresh alkaline cells. Dying batteries can cause sporadic cycle interruptions or prevent the thermostat from communicating with your furnace altogether. Gently dust the interior of mechanical thermostats with a soft brush, as dust build-up on internal sensors causes false temperature readings.
Test Your Heating Cycle Early
Do not wait for an freezing evening to test your heat for the first time. Conduct a test run on a crisp autumn morning:
-
Set your thermostat to HEAT mode.
-
Raise the target temperature 5 degrees above the current room temperature.
-
Listen for the system to engage. You should hear the draft inducer fan start, followed by ignition, and finally the main blower motor turning on within 1 to 2 minutes.
-
Let the system run for 15 minutes to verify that warm air reaches every room in your home.
Upgrade to a Smart Thermostat
If you still utilize an older manual or non-programmable thermostat, upgrading to a smart model offers immediate energy savings. Smart thermostats allow you to schedule setback temperatures while you are away at work or sleeping, reducing fuel consumption without sacrificing comfort.
4. Perform Vital Home Safety and Chimney Checks
Safety should always be top priority when preparing fuel-burning equipment for winter operations. Gas furnaces, oil boilers, and wood stoves generate combustion gases that must be safely vented out of your living spaces.
Carbon Monoxide and Smoke Detector Maintenance
Carbon monoxide (CO) is an odorless, colorless gas produced by incomplete combustion in gas or oil heating systems.
-
Test All Units: Press the test button on every smoke and CO alarm in your home.
-
Replace Batteries: Install fresh batteries in all detectors at the start of fall.
-
Check Expiration Dates: Carbon monoxide sensors degrade over time. Replace carbon monoxide detectors every 5 to 7 years, and smoke detectors every 10 years.
-
Placement Check: Ensure detectors are installed on every level of your home, especially directly outside sleeping areas.
Inspect Exhaust Flues and Chimneys
For systems that vent through a chimney or exterior PVC pipes:
-
Inspect outdoor vent pipes for bird nests, leaves, or rodent debris that could block toxic exhaust gases from exiting.
-
Check metal flue pipes inside your basement or utility room for signs of heavy rust, corrosion, or loose joints.
-
If you operate a wood stove or fireplace alongside your central heat, schedule an annual chimney sweep to remove highly flammable creosote buildup.
5. Bleed Radiators and Check Boiler Water Levels
If your home is heated by a hydronic system (a boiler distributing hot water to radiators or baseboards), air pockets inside the piping can prevent water from circulating properly. When air becomes trapped in a radiator, the top portion remains cold while the bottom stays warm, reducing heating capacity and wasting energy.
How to Bleed a Radiator
-
Turn on the Heating System: Allow your boiler to build up pressure and heat the radiators.
-
Identify Cold Spots: Carefully feel each radiator. If the top feels significantly cooler than the bottom, air is trapped inside.
-
Turn Off the Heat: Switch off the boiler and wait for the water inside to cool slightly to prevent burns.
-
Use a Radiator Key: Place a radiator key (or flathead screwdriver) into the bleed valve located at the top side of the radiator. Hold a small cup or rag beneath the valve.
-
Open the Valve Slightly: Turn the key counterclockwise a quarter-turn. You will hear a hissing sound as trapped air escapes.
-
Close When Water Appears: As soon as a steady stream of water begins to trickle out without sputter, close the valve firmly.
-
Check Boiler Pressure: After bleeding radiators, check the pressure gauge on your boiler. If pressure drops below normal operating levels (typically 12 to 15 PSI for residential systems), add water using your system’s automatic fill valve.
If your boiler exhibits persistent pressure drops, water leaks, or rattling pipe noises after bleeding, consult with licensed technicians for professional furnace and boiler repairs before the freezing weather arrives.
6. Inspect Ductwork and Seal Heat Leaks
Conditioned air escaping into cold attics, basements, or crawlspaces directly inflates your winter heating bills. Duct losses can account for more than 30% of total heating energy consumption in homes with uninsulated duct networks.
Finding and Sealing Duct Leaks
-
Visual Inspection: Examine exposed metal ductwork in your basement, attic, or utility closets. Look for loose joints, disconnected sections, or visible gaps.
-
Feel for Drafts: Run your hand along duct connections while the system fan is running to feel for escaping air streams.
-
Use Mastic Sealant or Foil Tape: Never use standard cloth “duct tape,” as its adhesive dries out and fails under heat exposure. Seal metal joints using paint-on duct mastic or heavy-duty foil tape rated for HVAC applications.
Address Building Envelope Leaks
Uncontrolled air infiltration forces your heating system to work constantly. Take time in early autumn to seal windows, exterior doors, and utility penetrations:
-
Apply fresh caulk around leaky window frames and exterior door trim.
-
Replace worn weatherstripping at the bottom of exterior doors.
-
Seal gaps around outdoor pipe entries, electrical conduits, and dryer vents using expandable spray foam.
7. Understand Heat Pump Operations for Cold Weather
Heat pumps have become extremely popular throughout Connecticut due to their exceptional efficiency. However, operating a heat pump in a region that experiences true freezing temperatures requires a solid understanding of how these systems function when frost arrives.
The Defrost Cycle Explained
During cold weather, moisture in the outside air freezes on the heat pump’s outdoor coil. This is entirely normal. To clear this frost, the heat pump periodically switches into its automatic defrost mode:
-
The outdoor fan temporarily shuts off.
-
The system reverses operation for a few minutes to melt frost off the outdoor coils.
-
You may see steam rising from the outdoor unit or hear a slight WHOOSH sound as the valve switches.
This automatic cycle is designed to keep the system running efficiently. However, if your outdoor heat pump becomes completely encased in thick ice or continuously runs without heating your home, it signals a stuck reversing valve or low refrigerant charge.
Managing Auxiliary / Emergency Heat
Most cold-climate heat pump installations feature backup electric resistance heat or integrate with an auxiliary gas furnace (a dual-fuel hybrid system).
-
Avoid Switching to Emergency Heat Manually: Thermostat settings labeled “EM HEAT” bypass the efficient outdoor heat pump entirely, relying exclusively on energy-intensive backup heating elements. Only use emergency heat if your outdoor unit experiences a mechanical breakdown.
-
Maintain Steady Temperatures: Heat pumps run most efficiently when maintaining a constant setpoint. Avoid lowering temperatures drastically at night, as bringing the house back up to temperature in the morning can trigger auxiliary heat strips unnecessarily.
8. Schedule Professional Seasonal Heating Maintenance
While DIY steps like filter changes, vent clearing, and thermostat checks are critical, they cannot replace a comprehensive inspection performed by a licensed HVAC professional. Professional maintenance goes deep inside the mechanical, electrical, and combustion assemblies that homeowners cannot safely access.
What Professional Technicians Inspect
A thorough seasonal tune-up ensures every component of your heating system operates safely and at peak factory efficiency:
-
Heat Exchanger Integrity: Technicians inspect heat exchangers for hairline fractures or corrosion. A cracked heat exchanger can leak deadly carbon monoxide into your indoor air supply.
-
Burner Assembly and Flame Sensors: Burners are cleaned and adjusted to guarantee complete, clean fuel combustion, while flame sensors are polished to prevent sudden ignition lockouts.
-
Electrical System Inspection: All wiring connections are inspected, tightened, and tested for proper voltage draw to protect delicate circuit boards and blower motors.
-
Gas Pressure and Safety Controls: Gas valves and limit switches are tested and calibrated to ensure precise fuel flow and reliable shutdown safety features.
-
Blower Assembly & Motor Amperage: Fan blades are cleaned of dust buildup and motor bearings are lubricated to minimize friction and wear.
Booking early autumn maintenance ensures your system is thoroughly vetted long before emergency repair lines get backed up during the winter’s first major cold front. Discover what to expect during a professional inspection by exploring local heating maintenance Norwalk services tailored to New England homes.
9. Know the Warning Signs of Heating Failure
Even with careful prep work, aging heating systems can exhibit signs of mechanical stress. Recognizing early warning signs allows you to address minor component issues before they spiral into total system failure in the dead of winter.
Key Warning Signs to Watch For
-
Unusual Noises: Grinding, squealing, or metallic clanking sounds often indicate failing motor bearings, loose fan belts, or damaged internal components. Banging noises upon startup can signal dirty burners causing delayed ignition.
-
Frequent Short-Cycling: If your furnace turns on and off rapidly every few minutes without reaching the thermostat’s set temperature, it may be overheating due to restricted airflow or a failing flame sensor.
-
Uneven Heating Across Rooms: Cold spots in specific bedrooms while other areas overheat indicate failing duct dampers, air balance issues, or a struggling blower motor.
-
Unexplained Spike in Fuel or Electric Bills: An abrupt surge in utility costs usually means your heating equipment is working twice as hard to compensate for worn internal parts.
-
Yellow or Flickering Burner Flame: A healthy natural gas furnace burner flame should burn crisp and bright blue. A soft yellow or orange flame indicates improper fuel combustion and elevated carbon monoxide risks.
If you observe any of these warning signs during your early autumn test run, skip the wait and book a diagnostic evaluation right away. For homeowners whose equipment is reaching the end of its operational lifespan (15+ years for furnaces and boilers, 10–15 years for heat pumps), evaluating options for heating installation services can save you thousands in repeated repairs while dramatically lowering monthly energy consumption.
10. Winter Readiness Checklist Summary
To make your seasonal prep as straightforward as possible, use this quick checklist as early fall approaches:
DIY Autumn Tasks
-
[ ] Replace air filters across all forced-air air handlers.
-
[ ] Move furniture, rugs, and curtains at least two feet away from all heating vents and radiators.
-
[ ] Clean dust and debris off supply grilles and radiator bases.
-
[ ] Trim back brush, weeds, and fallen leaves around outdoor heat pump units.
-
[ ] Replace batteries in thermostats, smoke alarms, and carbon monoxide detectors.
-
[ ] Test the heating cycle on your thermostat before cold weather arrives.
-
[ ] Bleed trapped air from hydronic baseboard units and radiators.
-
[ ] Inspect visible ductwork in unconditioned spaces and seal gaps with foil tape or mastic.
Professional Maintenance Tasks
-
[ ] Schedule an annual professional heating system tune-up.
-
[ ] Have gas line pressures, safety switches, and combustion exhaust flues inspected by a licensed technician.
-
[ ] Have ductwork professionally inspected and cleaned if heavy dust buildup is present.
Taking these simple, proactive steps guarantees that when the first freezing temperatures arrive, your home remains a warm, safe, and comfortable sanctuary for your entire family.
Ready to ensure your heating system is 100% prepared for winter?
Don’t wait for the first freezing cold front to test your furnace, boiler, or heat pump. Contact the expert team at Climate Care today to schedule your seasonal precision maintenance visit and enjoy worry-free comfort all winter long!