

Is Your AC Blowing Warm? The Homeowner’s Guide to Refrigerant Leaks
It is the hottest day of the year. The sun is beating down, the humidity is thick enough to chew, and you notice your air conditioner has been running for three hours straight without a break. You walk over to a vent, expecting a refreshing blast of arctic air, but instead, you get a pathetic, lukewarm breeze.
You might suspect your system is just “low on gas,” but in the HVAC world, that phrase is a bit of a misnomer. Unlike a car’s oil or gasoline, an air conditioner does not “consume” refrigerant. It is a closed-loop system. If the level is low, there is a hole that needs fixing.
In this comprehensive guide, we will dive deep into the mechanics of refrigerant leaks, the warning signs you can’t ignore, the changing landscape of AC chemicals in 2026, and why the “quick fix” is the most expensive mistake you can make.
The Invisible Engine: How Refrigerant Actually Works
Before we can understand the leak, we have to understand the liquid. Refrigerant is a specialized chemical compound that transitions from a liquid to a gas and back again to move heat.
-
Absorption: The indoor evaporator coil takes the heat from your indoor air and transfers it into the liquid refrigerant.
-
Compression: The outdoor compressor squeezes that gas, raising its temperature and pressure.
-
Release: The outdoor condenser coil releases that heat into the outside air, turning the gas back into a liquid.
-
Repeat: The cycle continues until your thermostat is satisfied.
When you have a leak, this cycle breaks. Without the proper volume of refrigerant, the system loses its ability to move heat effectively. It’s like trying to run a marathon while breathing through a straw—the effort increases, but the results disappear.
5 Red Flags of a Refrigerant Leak
Identifying a leak early can save you from a complete system meltdown. Most homeowners don’t realize there is a problem until the house is 80°F, but the signs are usually there much earlier.
1. Warm Air from Vents
This is the most obvious symptom. If the air coming out isn’t significantly colder (usually 15°F to 20°F colder) than the room temperature, the heat-exchange process is failing. If you have a digital meat thermometer, hold it up to a vent. if the air is barely cooler than the room, your refrigerant levels are likely critical.
2. Hissing or Bubbling Sounds
Refrigerant is stored under high pressure. If there is a crack in the copper lines or a pinhole in the coil, the gas escaping creates a distinct sound.
-
Hissing: Usually indicates a high-pressure gas leak.
-
Bubbling: Often heard when the leak is in a section of the line where the refrigerant is still in a liquid state.
3. Frozen Evaporator Coils
Low pressure causes the evaporator coil to drop below freezing, turning humidity into ice. If this happens, you likely need an emergency AC repair to prevent compressor failure.
Warning: If you see ice on your indoor unit or the copper pipes outside, turn the AC off immediately. Running a frozen unit can cause liquid refrigerant to “flood back” into the compressor, destroying it instantly.
4. A “Sticky” or Humid Home
An air conditioner’s secondary job is dehumidification. As the air passes over the cold coils, moisture condenses and drains away. When a leak occurs, the coils don’t get cold enough to pull moisture from the air. Even if the temperature is somewhat tolerable, your home will feel “heavy,” “sticky,” or “clammy.”
5. Spiking Utility Bills
Because the system can’t reach the target temperature, it never shuts off. Your compressor might run 24/7 trying to satisfy a thermostat it can no longer reach. This leads to a massive jump in your monthly electric bill—often the first sign homeowners notice before the system fails entirely.
Understanding Your Refrigerant Type: 2026 Edition
The cost and strategy for your repair depend heavily on what chemical your system uses. The HVAC industry has undergone massive regulatory shifts over the last few years to transition toward more eco-friendly options.
| Refrigerant Type | Status in 2026 | Cost Profile | Recommendation |
| R-22 (Freon) | Phased out (Legacy) | Extremely High | Replace System |
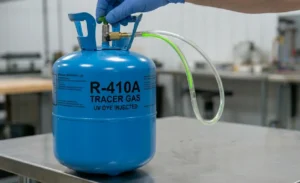
| R-410A (Puron) | Phasing Down | Moderate/Rising | Repair if Leak is Small |
| R-32 / R-454B | Current Standard | Stable/Affordable | Full Repair |
The R-22 “Freon” Crisis
 Now phased out and extremely expensive. If an R-22 system leaks, it is often more cost-effective to check our new AC installation options rather than paying for a recharge.
The R-410A Transition
R-410A was the standard for over a decade. However, under the AIM Act, it is currently being phased down to make room for lower “Global Warming Potential” (GWP) alternatives. While still widely available, the price is slowly increasing.
The New Generation: R-32 and R-454B
If your system was installed between 2024 and 2026, you are likely using these newer, high-efficiency refrigerants. These are designed to be better for the planet and are highly efficient. Because these systems are newer, they are almost always worth repairing under warranty.
The Danger of the “Quick Fix”: Why “Topping Off” is a Scam
Many homeowners ask if they can just “top off” the refrigerant. While this provides temporary relief, it is a bad long-term strategy. Adding gas to a leaking system is like pouring water into a bucket with a hole in the bottom. Furthermore, if your system is aging, the cost of constant refills might be better spent toward a professional AC installation of a high-efficiency unit that uses modern, cheaper refrigerants.
It’s Illegal (and Unethical)
Licensed technicians are governed by EPA Section 608 regulations. These rules require technicians to make a good-faith effort to find and repair leaks rather than simply venting ozone-depleting or high-GWP gases into the atmosphere.
It Wastes Money
Adding gas to a leaking system is like pouring water into a bucket with a hole in the bottom. Depending on the size of the leak, that expensive gas could leak out in two months, two weeks, or even two days. You will be stuck paying for the service call and the refrigerant all over again.
It Damages the Compressor
The compressor is the “heart” of your AC. It is designed to pump a very specific volume of refrigerant at a specific pressure. When a system is “low,” the compressor has to work harder and runs hotter. Over time, this heat breaks down the oil that lubricates the compressor. By the time you “top it off,” the internal damage may already be done.
How a Professional Fixes the Problem
When you hire a professional to handle a refrigerant leak, they don’t just “gas it up and go.” They follow a rigorous, multi-step process to ensure the system’s integrity.
 Phase 1: Leak Detection
Finding a leak is often the hardest part. Technicians use three primary methods:
Electronic “Sniffers”: Handheld devices that can detect refrigerant parts-per-million in the air.
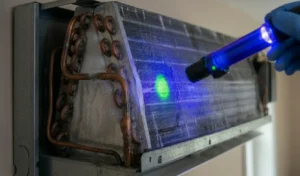
UV Dye Injection: A fluorescent dye is added to the system. After it circulates, the technician uses a UV light to see exactly where the “glow” is escaping.
Nitrogen Pressure Test: The system is emptied and filled with high-pressure nitrogen. A drop in the pressure gauge over 24 hours confirms a leak, and soapy bubbles are used to pinpoint the exact crack.
Phase 2: Sealing the Breach
If the leak is in a copper line set, it can often be “brazed” (a high-temperature welding process). However, if the leak is located deep inside the aluminum fins of an evaporator coil, the entire coil usually needs to be replaced.
Phase 3: The Deep Vacuum
This is the step most DIY-ers forget. Once the hole is fixed, the technician must use a vacuum pump to remove all air and moisture from the lines. If moisture stays in the lines, it reacts with the refrigerant and oil to create acid, which will eat the system from the inside out within a year.
Phase 4: Precision Recharging
Finally, the technician adds the new refrigerant. They don’t just “eyeball” it. They use a digital scale to charge the system to the exact weight (in ounces) specified on the manufacturer’s data plate.
The Economics of Repair vs. Replace
How do you know when to stop repairing a leak and start shopping for a new unit? Use the “Rule of 5,000.”
Take the age of your unit and multiply it by the cost of the repair. If the number is greater than $5,000, it is usually time to replace the system.
-
Example A: A 5-year-old unit with a $600 leak repair. ($5 \times 600 = 3,000$). Repair it.
-
Example B: A 12-year-old unit with a $1,200 leak repair and recharge. ($12 \times 1,200 = 14,400$). Replace it.
Furthermore, new systems in 2026 are significantly more efficient than those from ten years ago. A new installation can often lower your cooling bills by 30% to 50%, helping the unit pay for itself over time.
Preventative Maintenance: Stopping Leaks Before They Start
The best way to avoid a leak is through regular care. Many leaks are caused by “vibration rubs” or corrosion that can be caught early during a professional inspection. We recommend signing up for an annual AC maintenance plan to ensure your seals and coils are inspected before the summer heat hits.
Conclusion: Don’t Wait Until It Fails
A small refrigerant leak today is a guaranteed total system failure tomorrow. If you notice ice on your lines or warm air in your vents, turn the system off immediately and contact our HVAC specialists for a comprehensive leak inspection.


